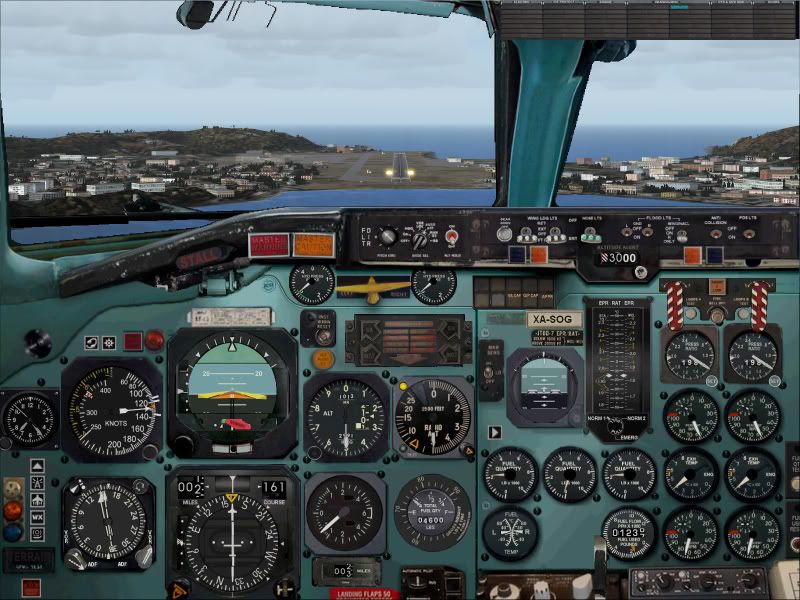
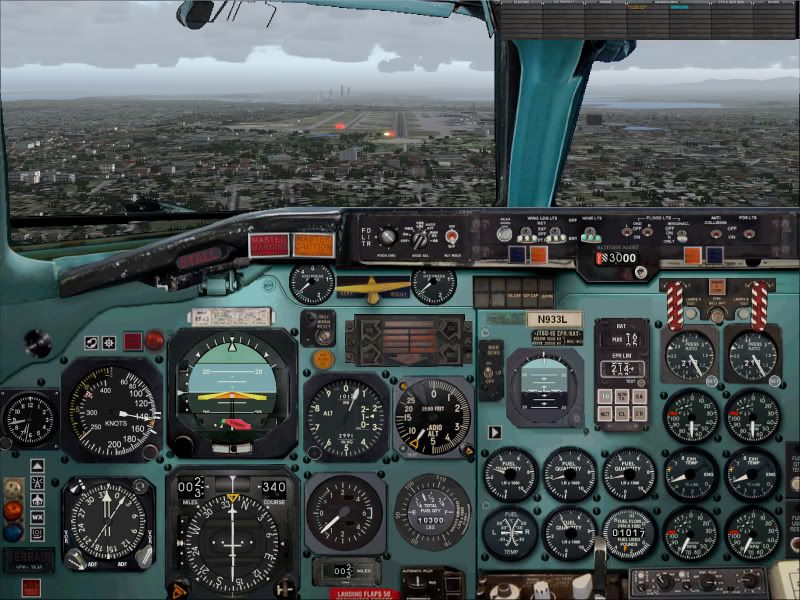
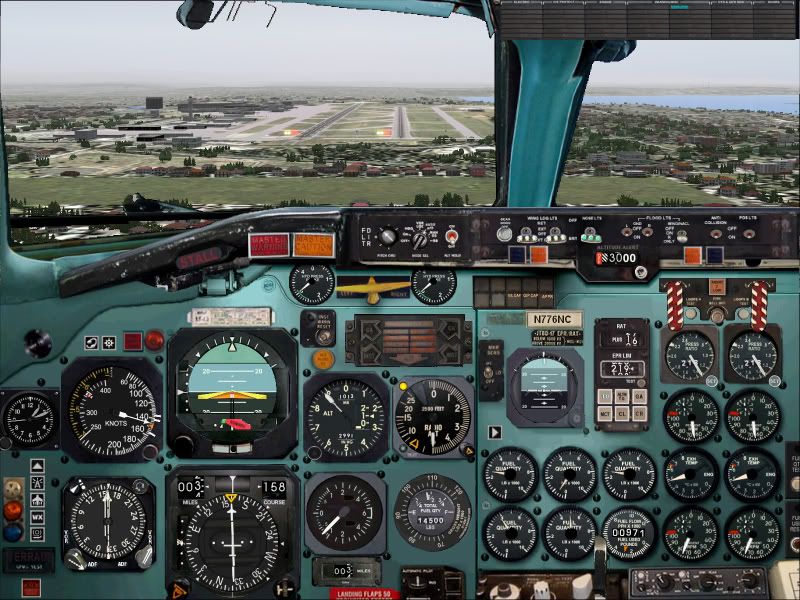
DC9 PANELS INSTALLATION & HANDLING NOTES # 3
UPDATED: April 7th 2024
1.0: THE FOLLOWING SECTION FOCUSES ON BOTH THE MAIN PANEL AND SUB PANEL INSTRUMENTATION ASSOCIATED WITH IT.1.1: MAIN PANEL - PRIMARY ENGINE INSTRUMENTS The entire right section of the Main Panel supports the primary engine instrument display .... featuring EPR, N1, EGT, N2, Engine #1 F/F, and Fuel Quantity gauges !
The EPR bugs can be adjusted by clicking the small grey knobs located at the bottom right of each EPR gauge. Mousing the left side of these gauges sets the EPR bugs to lower values. Mousing the right side of these gauges sets the EPR bugs to higher values.
The EPR gauges in each DC9 aircraft/engine panel are each set/bugged at different values. These values correspond with the correct maximum T/O EPR settings for each aircraft/engine type at SL and based on an ambient temperature of 15*C. T/O power should be set carefully so as to avoid exceeding the indicated EPR bug settings.
Setting the EPR bugs in accordance with values associated with altitudes other than SL and ambiant temperatures higher/lower than 15* C will require independent research on the part of the end user.
All other DC9 panel engine instrumentation is calibrated in accordance with the known performance parameters of each aircraft/engine type. For this reason it is essential to use the correct DC9 aircraft/engine panel with each DC9 aircraft/engine base pack/FDE or inaccurate performances/settings will result.
Located above the left Fuel Quantity gauage is "a small white right-pointing triangle". This icon is used to toggle secondary engine inst rumens panel into view.
1.2: MAIN PANEL - SECONDARY ENGINE INSTRUMENTS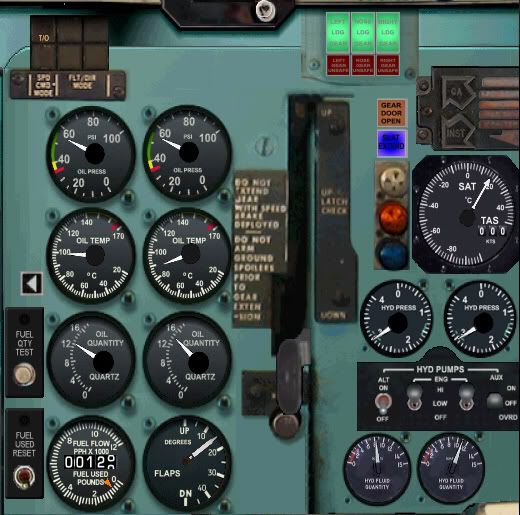
This sub panel features the landing gear lights, landing gear lever, TAS guage, Hydraulics System switches and gauges, Oil Pressure gauges, Oil Temperature gauges, Oil Quantity gauges, Engine #2 F/F, Flap gauge, and both Fuel Used and Fuel Reset selector switches.
The Hydraulics System is of paramount importance on this sub panel and is located within the small "HYD PUMPS" section of this sub panel.
The Hydraulics System features 4 separate hydraulics switches. The 2 center hydraulics switches must each be set to the "HI" position. Failure to do this will result in both the flaps and landing gear not functioning.
It is recommended that the 2 center hydraulics switches each be "clicked twice" to ensure they are set to the fully up/"HI" position. When these switches are set correctly the needles on both Hydraulics Pressure gauges (located above the Hydraulics switches) will each rotate to indicate
"3" .... confirming that sufficient hydraulics pressure is available for both the flaps and landing gear to function normally.
The Flap gauge is also displayed on this sub panel. On the ground .... keyboard command "F7" will cycle the Flaps, incrementally, through the following detentes and all the way down to the maximum FLAP 50 detente ....
DC9-10/15 "only"
- FLAP 10
- FLAP 20
- FLAP 30
- FLAP 50
DC9-10/15 aircraft are not equipped with SLATS/LEDC9-20-50 "only"
- SLATS/LE .... see blue SLAT/LE lamp on Main Panel !
- FLAP 5
- FLAP 15
- FLAP 25
- FLAP 40
- FLAP 50Inflight .... keyboard command "F7" will also cycle the Flaps, incrementally, through the to the same 6 detentes and all the way down to the maximum FLAP 50 detente.
Inflight .... Selecting "F8" will cycle the Flaps to the FLAP 40 detente only.
For environmental reasons FLAP 40 is the maximum mormal landing flap detente ever used on DC9 aircraft. Just as a matter of procedure.... FLAP 50 should be used on DC9-10 aircraft only.
During all approaches to landing it is recommended that the secondary engine instruments panel be toggled into view. This will aid viewing the Flap gauge when selecting flap settings during approaches to landing. It is also the recommended that the primary engine instruments panel be toggled back into view "after" selecting the final landing flap setting.
Located above the left Fuel Quantity gauge is "a small white left-pointing triangle". This icon is used to toggle the primary engine instruments panel back into view.
1.3: MAIN PANEL - ALTITUDE SELECTORAn Altitude Selector gauge is located at the top center right of the Main Panel and below the windshield
Any particular target altitude can be selected on this gauge which is normally used during climb/descent.
Target altitude values can be set per increments of 100 FT by clicking the small selector knob located at the bottom right of this gauge. Mousing the left side of this selector knob reduces the altitude value displayed in the gauge window. Mousing the right side of this selector knob increases the altitude value displayed in the gauge window.
The Altitude Selector also features a built-in audible Altitude Alert warning. This alert is triggered, automatically, when climbing/descending within 900 FT of any preselected altitude .... and again within 100 FT of exceeding any preselected altitude value should the altitude value displayed in the gauge window not first be reset !
The Altitude Selector is not connected to the Auto-Pilot. It does not feature an automatic altitude capture mode. An entirely separate and selectable automatic altitude capture mode is featured in the "PRESELECT ALTITUDE" section on Auto-Pilot sub panel.
1.4: MAIN PANEL - RADIO ALTIMETERA Radio Altimeter gauge is located at the center of each panel (to the right of the Altimeter gauge). This gauge features a selectable Decision Height Bug. Clicking the small orange knob located at the bottom right of the RA will adjust the DH bug to any desired altitude value between ZERO FT and 2,500 FT. Mousing the left side of this knob reduces the altitude value indicated by the DH bug. Mousing the right side of this knob increases the altitude value indicated by the DH bug. Setting the DH bug at any altitude value within the range of the RA altitude scale will trigger an automatic "MINIMUMS" call-out at that particular selected altitude .... normally during approaches to landing !
1.5: MAIN PANEL - GPWS Each DC9 panel features a built-in GPWS system which provides the following automatic Boeing type altitude call-out information during approaches to landing ....
- "TWENTY-FIVE-HUNDRED" ....
- "500"
- "100"
- "50"
- "40"
- "30"
- "20"
- "10"Not many, if any, DC9 aircraft were fitted with such a device but this information is useful during FS approaches to landing.
1.6: MAIN PANEL - ALTITUDE BAROMETRIC PRESSURE SETTINGPrior to T/O, and during climb/descent through 17,500 FT, the keyboard "B" command must be selected. This will, automatically, adjust altimeter barometric air pressure setting to the local environmental barometric air pressure value. Failure to do this will result in erroneous altimeter indications. The selected altitude barometric air pressure setting can be read within the small window located inside the bottom of Altimeter gauge.
1.7: MAIN PANEL - TOTAL FUEL QUANTITY & AIRCRAFT WEIGHT GAUGEThis gauge is located below the RA gauge.
The digital indication at the center of this gauge displays the aircrafts Total Fuel Quantity in LB units.
The scale around the outer rim of this gauge relates the all-up aircraft weight in LB units
The Total Aircraft Weight scale must be set prior to T/O. Clicking the center of this gauge ("once") rotates the scale around outer rim of this gauge to indicate the all-up aircraft weight .... both fuel and payload combined. This indication will reduce inflight, automatically, with fuel burn-off !
This gauge also works in conjunction with the ASI .... in order to calculate the correct weight related V-REF speeds. The Total Aircraft Weight gauge must be set prior to setting T/O V-REF speeds on the ASI or inaccurate speed calculations/call-outs will result. FOR FURTHER INFORMATION REFER TO SECTION 1.8.
Each DC9 panel features a Total Fuel Quantity/Total Aircraft Weight gauge which has been calibrated in accordance with the particular certified MGTOW capabilities of each DC9 type/series aircraft. For this reason it is essential to use the correct DC9 aircraft/engine panel version with each DC9 aircraft/engine base pack/FDE or inaccurate weight/speed calculations and performances will result !
1.8: MAIN PANEL - AIR SPEED INDICATOR GAUGEThe ASI gauge is located above the RMI.
3 white V-REF speed bugs are located around the outer right rim on the ASI gauge. Clicking the center of the ASI ("once") .... on the ground .... will automatically set the V-REF/speed bugs in accordance with FLAP 5 T/O speeds. Clicking the center of the ASI ("twice") .... on the ground .... will automatically set the V-REF/speed bugs in accordance with FLAP 15 T/O speeds.
FLAP 15 is the recommended setting for most short to medium length RWY's .... otherwise a FLAP 5 setting is quite adequate !
Setting the V-REF bugs triggers the following automatic speed call-outs during T/O ....
- "80K KNOTS"
- "V-1"
- "ROTATE"Clicking the center of the ASI ("once") .... inflight .... will automatically set the V-REF/speed bugs in accordance with FLAP 20 speeds. Clicking the center of the ASI ("twice") .... inflight .... will automatically set the V-REF speed bugs in accordance with FLAP 40 speeds. FOR FURTHER INFORMATION REFER TO SECTION 7.0.
Failure to set the ASI speed bugs prior to commencing T/O will trigger call-outs at well below the correct safety speeds and result in either a prolonged rotation or risk the aircraft stalling and crashing soon after T/O .... or both. The ASI speed bugs should be set only after the Total Aircraft Weight gauge has first been set or inaccurate T/O speeds will be calculated. FOR FURTHER INFORMATION REFER TO SECTION 1.7.
Silent/invisible "Hot Points" are also located around the outside right rim of the ASI gauge. These can also be used to set each of the 3 V-REF speed bugs but only within the range of FLAP 5 and FLAP 15 speed values calculated in conjunction with aircraft weight. It is not possible to manually adjust these speed bugs outside the range of these calculated speed values.
1.9: MAIN PANEL - HSI INSTRUMENT & HDG/VOR COURSE SELECTORSThe Main Panel HSI instrument features both HDG and VOR course selector knobs.
Mousing close to the center left or center right of the orange HDG SEL knob (located at the bottom left of the HSI) rotates the orange HDG indicator inside the HSI per increments of 1 degree. Mousing away from the center left or center right of the orange HDG SEL knob rotates the orange HDG indicator inside the HSI per 10 increments.
Mousing close to the center left or center right of the black VOR/Course Selector knob (located at the bottom right of the HSI) rotates the white VOR/Course indicator inside the HSI per increments of 1 degree. Mousing away from the center left or center right of the black VOR/Course Selector knob rotates the white VOR/Course indicator inside the HSI per 10 degree increments.
DME1 is located at the top left of the HSI (DME2 is located below the ROC/ROD gauge on the Main Panel). The selected course is also digitally displayed at the top right of the HSI.
1.10: MAIN PANEL - ENGINE FIRE WARNING/DETECTION SYSTEM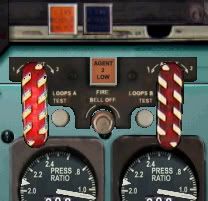
An engine Fire Warning system is located at the far right on each main panel and below the windshield. This Fire Warning system is functional .... in test mode only.
Clicking the Fire Warning system test mode switch will result in the engine fire indicator lamp illuminating and the Fire Warning system bell also then being triggered. This will also, in-turn, illuminate the Main Panel "MASTER CAUTION" warning lamp as well as the Overhead Panel annunciator "Fire" warning lamp.
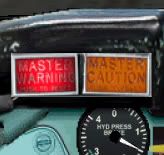
Clicking either the "MASTER CAUTION" warning lamp or the main panel "INST WARN RESET" button will extinguish both warning lamps. Clicking the Fire Warning system test mode switch will silence the Fire Warning system bell.
1.11: MAIN PANEL - SUB PANEL SELECTION ICONS & AND KEYBOARD COMMANDS5 sub panel selection icons are located below the clock at the extreme left side of the Main Panel. Clicking these icons toggles various sub panels into view. These icons are arranged in a vertical row and appear in the following order .... from top to bottom ....
- ICON #1 .... "small white up-pointing triangle". This icon toggles the Overhead sub panel into view. Additionally .... the OH Panel (because of its size) also features 2 sub panel selection icons located at its bottom left corner. These 2 icons are also arranged vertically and are used to close the OH Panel ("Small white down-pointing triangle") or toggle the AP panel in and out of view whenever the OH Panel is in use.
- ICON #2 .... this icon toggles the Auto-Pilot sub panel into view. The the lower section of this panel also features the VHF/VOR radio frequencies.
- ICON #3 .... this icon toggles the Center Pedestal sub panel into view. The the lower section of this panel also features the Rudder Trim knob, and both pneumatic fuel valve crossfeed levers.
- ICON #4 .... "WX" .... this icon toggles the Weather Radar sub panel into view. The left side of this panel also features the ADF1, ADF2, and the Transponder.
- ICON #5 .... this icon toggles the Aircraft Push-Back and Taxi Speed Control utility into view.
Clicking any of these icons a 2nd time closes the respective sub panel view.
The following keyboard commands also toggle the above sub panel views into view along with some other panel features for which there is no selectable panel icon ....
SHIFT+2 = Secondary Engine Instruments and Hydraulics Panel
SHIFT+3 = Weather Radar and ADF1, ADF2, and Transponder Panel
SHIFT+4 = Overhead Panel
SHIFT+5 = EPR Scale (enlarged version)
SHIFT+6 = T/O Data V-REF Card
SHIFT+7 = AP, VOR, Coms Radio Panel
SHIFT+8 = Center Pedestal Panel
SHIFT+9 = Push-Back and Taxi Speed Control Panel1.12: MAIN PANEL EXTERNAL LIGHTING SWITCHES" The external lighting switches are Located along the center top right of the Main Panel and just below the windshield. From left to right these are labeled "WING LANDING LTS" (2 switches), "NOSE LTS", FLOOD LTS" (3 switches), "ANTI COLLISION", and "POS LTS".
The "WING LANDING LTS, NOSE LTS" and the extreme right "FLOOD LTS" switches each have 2 selectable positions.
Both the "ANTI COLLISION" and "POS LTS" switches can also be activated from the Overhead Panel. FOR FURTHER INFORMATION REFER TO SECTION 2.1.
1.13: MAIN PANEL GEAR WARNING HORN CANCELATION BUTTONThe landing gear warning horn cancellation button (a very small grey button) is located at the left of the pair of wing landing light switches. This button is labelled "GEAR HORN OFF".
It has been observed that (for reasons yet to be determined) the landing gear warning horn may, on rare occasions, be triggered automatically .... a long continuous tone. Clicking the "GEAR HORN OFF" button will cancel this warning horn should it ever be triggered.
Under normal circumstances the landing gear warning horn will only be triggered when the flaps are extended beyond 15* and before the landing gear has been extended. In this case it is not possible to cancel the landing gear warning horn using the GEAR HORN OFF button. In this case this warning horn will be cancelled, automatically, only when the landing gear has been fully extended.
1.14: MAIN PANEL FLIGHT DIRECTORThe Flight Director and Flight Director Mode switches are located along the center top left of the Main Panel and just below the windshield. From left to right these are labeled "PITCH CMD" and "MODE SEL".
Selected FD modes are annunciated per instrument indications on the HSI.
2.0: THE FOLLOWING SECTION FOCUSES ON THE SUB PANELS AND INSTRUMENTATION ASSOCIATED WITH THESE.2.1: OVERHEAD PANEL.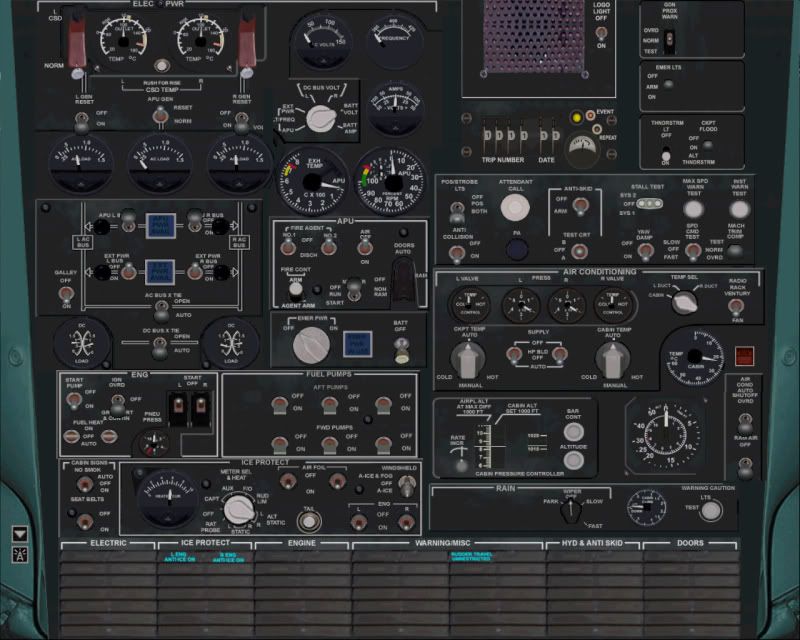
Starting at the top left quadrant of the Overhead Panel and working down ....
This section of the OH Panel features the Electrical system .... labeled "ELEC PWR"
Both "L GEN, R GEN", and "DC BUS VOLT" switches are of paramount importance in this section. Failure to set these switches correctly will result in a compete electrical systems failure which will render both the AP and Radios inoperable .... along with all other electrically dependent panel instrumentation !
The bottom left quadrant of the OH Panel features both the Engine Startup switches and Cabin Signs switches .... labeled "ENG" and "CAbIN SIGNS" respectively
Moving down towards the bottom center left quadrant of the OH Panel and then working up ....
This section of the OH Panel features both the Anti-Ice system switches, and Fuel Pump switches .... labeled "ICE PROTECT" and "FUEL PUMPS" respectively.
The Fuel Pump switches are of paramount importance in this section. All of these must be selected "ON" prior to engine startup or the engines will not start.
Located at the center left of the OH Panel is the APU System .... labeled "APU".
Moving up towards the top right quadrant of the OH Panel and then working down ....
This section of the OH Panel features the Logo Light switch, Emergency Lights Arm switch, Coockpit Floodlights switch, and CVR system buttons.
Located along the center right of the OH Panel is the Position Strobe Lights switch, Anti-Collision Lights switch, Cabin Attendant Call button, external PA Coms button, Anti-Skid switch, and Yaw Damper Switch, and SPD CMD TEST" switch.
Selecting the OH Panel "POS/STROBE LTS" and "ANTI COLLISION" lights switches "ON" also activates these same lighting switches on the Main Panel. FOR FURTHER INFORMATION REFER TO SECTION 1.13.
Moving down towards the bottom center right quadrant of the OH Panel ....
This section of the OH Panel .... labeled "AIR CONDITIONING" .... features the Air Conditioning System, Radio Rack Ventury Fan switch, Air Conditioning Auto Shut-Off switch, Ram Air switch, and the Cabin Pressurization control System. FOR FURTHER INFORMATION REFER TO SECTION 2.3.
Both the Air Conditioning "SUPPLY" switches and Cabin Pressurization selector knob are of paramount importance in this section. These must be selected "OFF" during engine startup sequences or the engines will not start.
The Cabin Pressurization scale must be set, and the CP Cabin Pressurization system lever also set, in order for the cabin to be able to pressurize and to avoid a pressurization failure warning when passing through 10,000 FT.
Moving down to the very bottom quadrant of the OH Panel and the back towards the center left ....
This entire section of the OH Panel features the Annunciator warning lamp system, and the Windshield Wiper control knob in a section labeled "RAIN".
2.2: OVERHEAD PANEL - ENGINE FUEL PUMP SWITCHES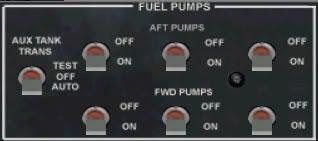
The engine Fuel Pump switches are arranged in 2 horizontal rows of 3 switches (located at the lower center left portion of the OH panel and above "ICE PROTECT" system). All 6 of these switches must be selected "ON" during engine startup sequences or the engines will not start.
The START PUMP switch (located in the "ENG" section in the lower left portion of the OH panel is the only fuel switch which must be selected "ON" when starting the APU.
2.3: OVERHEAD PANEL - CABIN PRESSURIZATION SYSTEMThe "ALTITUDE" knob located on the "CABIN PRESSURE CONTROL" section of the Overhead Panel must be set to the desired cabin altitude pressure value for high altitude cruise. Clicking this knob sets the cabin altitude pressure value. Mousing the right side of the "ALTITUDE" knob raises the altitude value displayed in the vertical "ALT/CABIN ALT SET" scale. Mousing the left side of the "ALTITUDE" knob reduces the altitude value displayed in the vertical "ALT/CABIN ALT SET" scale. FOR FURTHER INFORMATION REFER TO SECTION 2.1.
The Numerals displayed in the left "CABIN ALT SET" scale gauge window refer to altitude values in units of 1,000 FT.
The numerals displayed in the right side of the right "CABIN ALT SET" scale gauge window refer to altitude/barometric air pressure values in millibar units.
Clicking the "BAR CONT" knob (located above the "ALTITUDE" knob) adjusts the altitude barometric air pressure value. Mousing the right side of the "BAR CONT" knob raises the altitude barometric air pressure value displayed in the gauge window/scale. Mousing the left side of the "BAR CONT" knob reduces altitude barometric air pressure value displayed in the gauge window/scale.
Immediately prior to T/O the yellow Cabin Pressurization system tab (located on the Center Pedestal panel .... above the CP Rudder trim knob) must also be set to the "CABIN ALT" position. Failure to do this will result in the aircraft cabin not being able to pressurize during climb to altitude .... FOR FURTHER INFORMATION REFER TO SECTION 4.4. This will trigger a pressurization failure alarm when passing through 10,000 FT .... resulting in the illumination of both the red "MASTER WARNING" lamp on the Main panel as well as the "CABIN PRESSURE" warning lamp on OH Annunciator Panel.
2.4: OVERHEAD PANEL - ANNUNCIATOR WARNING LIGHTS SYSTEM
The Annunciator display panel occupies the entire lower section of the OH panel.
This panel features a multiplice of system cautions/warnings each of which are advised per illuminated caution/warning lamps. Critical systems cautions/warnings are advised per an illuminated "RED" lamp .... and also by either illuminated "MASTER WARNING" or "MASTER CAUTION" warning lamps located on the Main Panel. Important systems cautions/warnings requiring decisive action are advised per an illuminated "YELLOW" lamp. Less important systems warnings (which still require attention) are advised per an illuminated "BLUE" lamp.
The Annunciator cautionary/warning lamp system can be tested by clicking on the "LTS TEST" button located at the bottom right of the OH panel. This test will illuminate the entire Annunciator panel display.
The Annunciator panel is also partially visible at the top right quadrant of each main panel and will display illuminated caution/warning lamps. In Main panel view these lamps will not be readable and the OH panel will need to be opened for the caution/warning lamp to be identified.
2.5: OVERHEAD PANEL - flight deck FLOODLIGHTS SWITCHThis switch is labeled "CKPT FLOOD". It is located in the top right quadrant of the OH panel. Selecting this switch to "ON" provides soft illumination over the Main panel, instruments, and sub panels. When selected this illumination is evident during both evening environments and dusk/dawn transitions.
3.0 AUTO-PILOT PANEL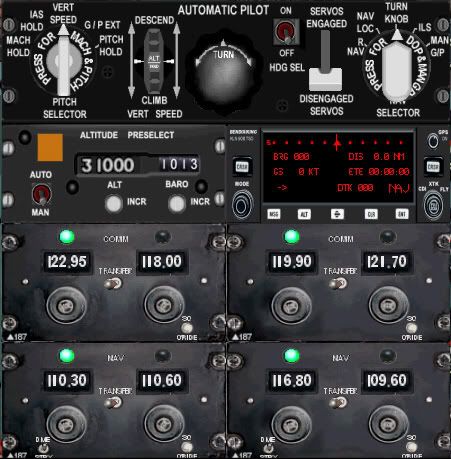
Starting from the left quadrant and working across to the right and then down the Auto-Pilot sub panel ....
The entire upper quadrant of the AP sub panel features AP Pitch Mode Selector knob, AP Vert Speed Control thumb wheel, AP Turn/Roll knob, AP Heading Hold switch, AP System engage/disengage paddle switch, and the AP Mode Selector knob.
Moving down to the bottom right quadrant the AP sub panel ....
Located across the center of the AP sub panel is the AP "ALTITUDE PRESELECT" system, and the KLN90B NAV System.
Located across the bottom of the AP sub panel are both COM1 and COM2 Radios, and below these are both the NAV1 and NAV 2 radios.
The DC9 panel AP functions in almost precisely the same manner as that of the HJG DC8 panels, but, the DC9 AP is also equipped with an automatic altitude capture mode which the DC8 panels do not feature.
The AP system is engaged, inflight, by setting the AP paddle switch to the "SERVOS ENGAGED" position.
The AP system can be disengaged, inflight, by setting the AP paddle switch to its "SERVOS DISENGAGED" position .... or by selecting the keyboard "Z" command. Deactivating the AP will trigger AP disconnect warning/alarm and will also cause the red "AP" annunciator lamp on the Main Panel Bowtie gauge (located above both the Altimeter and ROC/ROD gauges) to illuminate and then flash constantly. This warning lamp can be canceled/extinguished by clicking ("once only") on the main Panel "INST WARN RESET" knob (located beside the Bowtie gauge).
Disconnecting the AP will result in all previously coupled AP flight modes being canceled. The aircraft must then be controlled manually.
The AP cannot function if both the "L GEN BUS" and "R GEN BUS" on the OH panel have not first been selected "ON".
3.1: AUTO-PILOT PANEL - AP CONTROLLED CLIMB/DESCENTDuring AP controlled climb/descent the aircrafts ROC/ROD can be adjusted by clicking the Vert Speed thumb wheel. Mousing the bottom of the Vert Speed thumb wheel ("CLIMB" position) will control ROC. Mousing the top of the Vert Speed thumb wheel ("DESCEND" position) will control ROD .... both in proportion to mouse input. Each individual mouse click over the Vert Speed thumb wheel corresponds to an approximately 100 FPM adjustment to any established ROC/ROD.
The AP Vert Speed thumb wheel can also be used to engage the AP altitude hold mode. The aircrafts ROC/ROD should first be set at no more than 500 FPM .... less during the last few hundred of climb/descent towards any target altitude. Clicking on the center of the Vert Speed thumb wheel as the altimeter needles indicate on the desired altitude will engage the AP ALT HLD mode. The aircraft will then begin to maintain the selected altitude. The aircraft may, at first, drift slightly above or below the selected altitude .... this is quite normal. The aircraft will eventually settle into a perfect altitude capture after a few moments. Care should be taken to engage this ALT HLD mode precisely .... paying close attention to both the altimeter and the ROC/ROD is essential !
Adjustment to any captured ALT HLD altitude value is possible by clicking the Vert speed thumb wheel. Mousing either the bottom or top ("DESCEND") or bottom ("CLIMB") of the Vert Speed thumb wheel disengages the AP ALT HLD function without disengaging the AP and allows any new ROC/ROD to be established.
The Vert Speed thumb wheel will not, intentionally, function in manual flight mode. In manual flight mode the ROC/ROD must be set manually. In this case it is recommended that the keyboard "HOME" and "END" commands (Windows XP) be used in order to adjust Trim and to establish the desired ROC/ROD. In manual flight mode the Trim warning horn will triggered, automatically, in response to significant Trim adjustment. The Trim warning horn will not be triggered when Trim is adjusted using the Vert Speed thumb wheel and during AP controlled flight modes.
3.2: AUTO-PILOT PANEL - AP IAS/MACH HOLD MODES The AP Pitch Mode Selector features both "IAS HOLD" and "MACH HOLD" options. The "IAS HOLD" option should not be engaged below 290KTS or above FL250. The "MACH HOLD" option should only be used above FL250.
When either "IAS HOLD" or "MACH HOLD" modes are engaged the AP will adjust the aircrafts pitch attitude, automatically, and in accordance with power setting, in order to maintain a particular speed. The AP will always endeavor to hold whatever speed was acquired when either of these modes is first engaged. If more power is then applied the AP will respond by increasing the aircrafts pitch attitude to maintain speed. If power is retarded then the AP will respond by decreasing the aircrafts pitch attitude. This will also result in automatic AP controlled ROC/ROD adjustments during climb/descent.
"IAS HOLD" and "ALT HOLD" cannot be engaged together. Either one or the other mode only can be engaged at any time.
"IAS HOLD" is not an AT system and should not be used as such.
3.3: AUTO-PILOT PANEL - AP TURN/ROLL MODE A large "TURN" knob is located in the center of the AP. This can be used to roll the aircraft left or right during AP controlled flight modes. This action is available only when the AP Mode Selector knob is set to the "TURN KNOB" position.
It has been observed that the AP "TURN" knob will not roll the aircraft through perfectly smooth turns during FS panel view mode. During FS external view mode the aircraft may also be seen to slowly roll-over and dive when the AP "TURN" Knob is selected to its maximum axis. This is a known FS bug associated with these, and some other, panels and which we can do nothing whatsoever about. It is recommended that the AP "HDG SEL" mode be used to ensure perfectly smooth turns during AP controlled flight and in conjunction with the HSI HDG SEL bug.
3.4: AUTO-PILOT PANEL - AP COURSE/HDG/NAV/ILS MODE Setting the AP "HDG SEL" mode switch to the "ON" position allows the aircrafts heading to be controlled by manipulating the heading Bug on the Main Panel HSI. Manually controlled turns (per Joystick or Yoke input) during AP controlled flight are possible prior to this mode being engaged. It is not possible to manually adjust the aircrafts heading (per Joystick or Yoke input) when the AP "HDG SEL" mode switch is engaged.
Setting the AP mode selector switch to the "VOR LOC" position allows the aircraft to engage and track along the radial emanating from any pre-tuned and captured VOR beam.
VOR radials should be intercepted at less than a 20 degrees to the intended beam. Engaging the AP "VOR/LOC" mode at too acute an angle of intercept will result in the aircraft constantly weaving as it endeavors to capture the intended VOR beam. It is recommended that the "HDG SEL" mode be used to first align the aircraft with the VOR beam .... then "VOR/LOC" mode engaged once the aircraft is established on the intended beam. The aircraft may still weave slightly over the beam at first .... this is a normal FS response. The aircraft will settle into to perfectly smooth tracking after a few moments.
The AP mode selector switch also features an "ILS" mode. This allows coupled AP controlled ILS intercepts during approaches to landing on any ILS equipped RWY. The AP should be selected "OFF" and all landings then performed manually when passing 100 FT.
3.5: AUTO-PILOT PANEL - PRESELECT ALTITUDEAltitudes can be preselected and then automatically captured using the AP "Altitude Preselect" mode.
This mode is available only when the AP system is activated.
The small white AP "ALT INCR" button must first be clicked ("once only") in order to render this mode active. Altitude values can the be entered into the gauge window by clicking this button. Mousing the right of the "ALT INR" button (roughly on the "INCR" label) increases the Preselect Altitude value. Mousing the left of this "ALT" button (no visible label) reduces the Preselect Altitude value.
Preselected altitude values can be set in units of 1,000 FT only.
Upon setting the desired Preselected Altitude value the AP "MAN/AUTO" switch (located to the left of the "ALT button) must then be set to the "AUTO" position in order to enable the automatic altitude capture mode to function.
The aircrafts actual ROC/ROD to any Preselected Altitude must then be carefully monitored and adjusted using the AP Vert Speed thumb wheel.
Upon acquiring a Preselected Altitude the "AUTO/MAN" switch will automatically disengage and reset itself to the "MAN" position as the Preselected Altitude value is captured. The AP will then be observed to level the aircraft to maintain the Preselected Altitude. The aircraft may, at first, be observed to drift slightly above the Preselected Altitude value, but will, after a few moments, settle into a perfect altitude capture.
For smooth altitude captures it is recommended that the aircrafts ROC/ROD should always be reduced, manually, to less than 1000 FPM within the last 1000FT of climb toward any target altitude .... or .... reduced to less that 500 FPM within the last 500FT of climb toward any target altitude .... or reduced to less than 200 FPM within the last 200-100 FT of climb toward any Preselect Altitude. The lower the ROC/ROD within the last few hundred feet of climb towards any target altitude then the better/smoother the altitude capture.
Adjustment to any captured Preselect Altitude value is possible. The small white "ALT INCR" button must first be clicked (it will not be possible to select another altitude value until this has been done) in order to reactivate the system. A new target altitude value must then be entered by mousing the left or right sides of the "ALT INCR" button. The automatic altitude capture mode must then be reactivated by resetting The AP "AUTO/MAN" switch to the "AUTO" position. The aircrafts progress toward the new Preselected Altitude must then be carefully monitored and adjusted using the AP Vert Speed thumb wheel in order to ensure smooth altitude captures.
4.0: CENTER PEDESTAL PANEL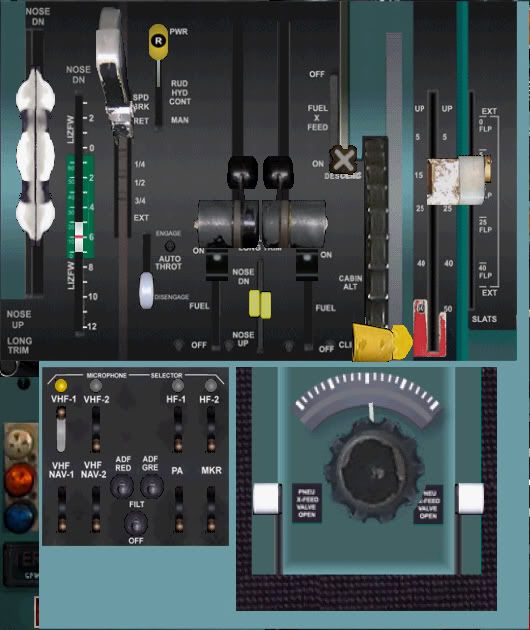
Starting from the left quadrant and moving across towards the right and then down the Center Pedestal sub panel ....
The entire upper section of the CP sub panel features the Trim indicator, Speedbrake/Spoiler lever, Rudder Hydraulics power lever, Auto-throttle system lever, Engine #1 and Engine # 2 thrust levers, Engine #1 and Engine #2 Startup fuel levers, fuel crossfeed lever, Cabin Pressurization system lever, and the Flap lever.
Moving down towards the bottom right quadrant the CP sub panel ....
Located at the center bottom right of the CP sub panel is the Rudder Trim knob, and both Engine #2 and Engine #2 pnuematic fuel Valve crossfeed levers.
4.1: CENTER PEDESTAL PANEL - RUDDER TRIM KNOBClicking on the CP Rudder Trim knob allows fine rudder adjustments. Mousing the left side of this knob adjusts Trim to the left. Mousing the right side of this knob adjust Trim to the right. No more than 3 mouse clicks either side of the Rudder Trim knob are normally sufficient to achieve the desired Trim response. Rudder Trim should be used cautiously during AP controlled flight. Excessive Rudder Trim adjustment during AP controlled NAV flight modes will cause the aircraft to begin flying in a slightly banked attitude whilst continuing to hold a captured VOR beam. Disconnecting the AP after engaging Rudder Trim will level the aircrafts bank attitude but also result in the aircraft then slowly beginning to drift away from its previous heading/course. Resetting the Rudder Trim knob to its default/neutral setting and then re-engaging either the AP HDG HLD or AP NAV LOC modes will resolve this.
Using the Rudder Trim knob can be advantageous when using the AP VOR/LOC NAV mode since minor "drift" may, in some cases, be observed when comparing the actual HSI bearing with that of the selected/intercepted VOR course beam. The intercepted VOR course beam will continue to be tracked/navigated correctly in such cases anyway.
4.2: CENTER PEDESTAL PANEL - ENGINE PNEUMATIC FUEL VALVE CROSSFEED LEVERS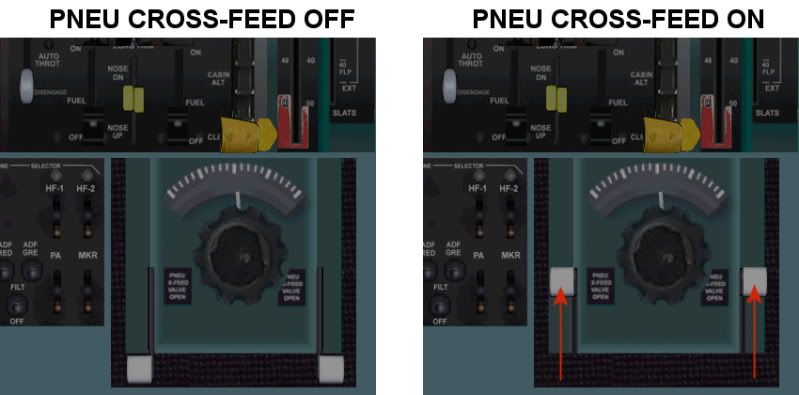
The CP pneumatic fuel valve crossfeed levers are the 2 large white capped levers located at the bottom right of the CP panel. These should not be confused with the fuel CP crossfeed lever or the pneumatic fuel valve crossfeed levers. Both Engine #1 and Engine #2 pneumatic fuel valve Crossfeed levers must be first be set to the fully "UP/ON" position, prior to engine startup, or the engines will not start.
4.3: CENTER PEDESTAL PANEL - ENGINE FUEL VALVE CROSSFEED LEVERSThe CP Engine # 1 and Engine #2 startup fuel levers are 2 small black levers located below each of the 2 respective engine thrust/power levers. Both Engine # 1 and Engine #2 startup fuel levers must each be set, individually, to the "ON" position at 20% N2 during engine startup sequences or the engines will not start.
4.4: CENTER PEDESTAL PANEL - CABIN PRESSURIZATION SYSTEM LEVERThe CP Cabin Pressurization system lever is the small yellow tab located above the CP Rudder trim knob. This tab must be set to the "CABIN ALT" position prior to T/O or the aircraft cabin will not pressurize. FOR FURTHER INFORMATION REFER TO SECTION 2.3.
4.5: CENTER PEDESTAL PANEL - AUTO-THROTTLE SYSTEM LEVERThe CP Auto-Throttle system lever is the small white lever located below the yellow "RUD HYD CONT" lever. The DC9 Auto-Throttle system is used only during approaches to landing. The ASI V-REF bugs must be set prior to commencing any approach to landing. The CP AT lever must then be set to the "ENGAGED" position. When activated the AT system will respond by maintaining the aircraft at the calculated V-REF speed throughout the aircrafts approach to landing. The AT System works independently of the AP System. This AT system is not intended to be used inflight. It will not, and is not intended to, maintain the aircraft at a constant speed/MACH throughout climb/cruise/descent. The orange ASI speed bug is adjustable but has no function whatsoever in relation to AT coupled speed modes. The AT system will disconnect .... automatically .... upon ground contact after landing. FOR FURTHER INFORMATION REFER TO SECTION 7.0.
5.0: WEATHER RADAR PANEL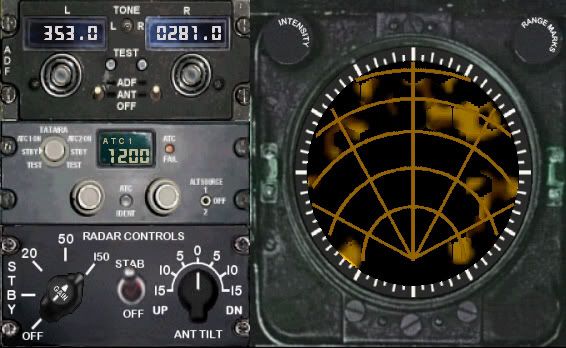
Starting from the left and working down then across to the right of the Weather Radar sub panel ....
Located at the top left quadrant of the WX sub panel are both ADF1, ADF2, and the Transponder radios.
Located at the bottom left quadrant of the WX sub panel are the range and antennae control knobs for the Weather radar Set.
Moving across to the right of the WX sub panel ....
Located at the right quadrant of the WX sub panel is the actual Weather Radar screen.
PLEASE NOTE: The WX Radar featured in HJG panels can accurately detect, and display, actual FS meteorological conditions. This feature requires either a "free" or "fully licensed" version of Pete DOWSON's FSUIPC module.
Pete DOWSON's FSUIPC module/s can be obtained per the following link ....
forum.simflight.com/topic/80977-updated-modules/Go to the following section of the above linked posting ....
UPDATED MODULES
"FOR FSX, FSX-SE and Prepar3D"The current and last updated FSUIPC module "for FSX" is
version 4.977."FOR FS9"The current and last updated FSUIPC module for FS9 is the listed
version 3.999z9bBe sure to identify, download, and install the FSUIPC module in accordance with one's FS version of choice/use. Be sure to carefully "READ" the accompanying FSUIPC Installation Instructions. Be advised: Both FS9 and FSX versions (only) of FSUIPC are no longer supported by Pete DOWSON .... and beyond recommending use of this utility (since 2006) HJG does not provide FSUIPC support either (Pete DOWSON's documentation accompanying this module is very comprehensive and more than adequate).
6.0:MAIN PANL - SECONDARY ENGINE INSTRUMENTS FLAP AND GEAR RETRACTION/HYDRAULICSIt will not be possible to extend/retract either the flaps or landing gear until the 2 center Hydraulics switches are set to the "HI" position. Both of these switches are located in the "HYDRAULICS" section of the "Secondary Engine Instruments" sub panel .... in the section of this panel labeled "HYD PUMPS".

The "Secondary Engine Instruments" sub panel is toggled into view by clicking the small white triangle located located on the Main Panel .... immediately above the left "FUEL QUANTITY" gauge. FOR FURTHER INFORMATION REFER TO SECTION 1.2.
7.0: LANDING/TOUCHDOWNAll landings/touchdowns should then be flown manually.
Maintaining correct approach speeds during both manaul and coupled ILS approaches to landing is essential. Applying too much power/speed during approaches to landing will force the aircrafts nose attitude "down". Insufficient power/speed during approaches to landing will cause the aircrafts nose attitude to drift "up". V-REF speeds should be set, automatically, on the ASI prior to commencing all approaches to landing and then further manually adjusted only if necessary. FOR FURTHER INFORMATION REFER TO SECTION 1.8.
An AT system is also available for use during appraches to landing only. FOR FURTHER INFORMATION REFER TO SECTION 4.5.
The AP system should be selected
"OFF" at between 50 FT and 100 FT prior to touchdown and the landing then completed manually.
The AT system will disconnect .... automatically .... upon ground contact after landing.
Power should be retarded to idle at between 10 FT and 20 FT above the RWY and the aircrafts ROD decent reduced to no more than 100 FPM to 200 FPM to ensure relatively smooth touchdowns that will avoid bouncing the aircraft.
Spoilers should be deployed as soon as the maingear makes ground contact.
Reverse thrust should then be applied (keyboard command
"F2" only when all 3 landing gear are firmly settled on the RWY and the aircrafts engines are almost fully idled. 2 "YELLOW" reverser in transit lamps will illuminate on the Main panel when reverse thrust is selected. The F2 key must be held down only until 2 "BLUE" Main panel reverser engaged lamps illuminate to ensure that reverse thrust has been properply engaged. Both blue and yellow reverser lamps will extinguish .... automatically .... when reverse thrust is cancelled. FOR FURTHER INFORMATION REFER TO SECTION 8.0.
AP controlled auto-landings are possible using these aircraft/panels, but, will be "firm" .... if successful .... and may otherwise result a crash.
8.0: AEROMUSICA DC9 SOUNDPACKSUse the recommended HJG hosted AEROMUSICA DC9 soundpacks.
Reverse thrust WAV featured within each of these soundpacks is compiled with sufficient playback duration to last aircraft deceleration from a sensible landing speed down to 80 KTS before filtering out completely. Reverse thrust will still need to be canceled manually (keyboard command
"F1") in order to prevent it looping. FOR FURTHER INFORMATION REFER TO SECTION 7.0.
Reverse thrust WAV in each AEROMUSICA DC9 soundpack is, intentionally, a little more quiet than that of other AEROMUSICA aircraft soundpacks .... as is also the case with AEROMUSICA B727 soudpacks too. Remember .... the engines on DC9 aircraft are mounted at the rear of the fuselage and are therefore somewhat less audible.
PLEASE NOTE .... all AEROMUSICA soundpacks are, intentionally, compiled on the basis of what can be heard from a "flight-deck" perspective and which is quite different to what is heard from the PAX cabin environment aboard most commercial aircraft.
9.0: KNOWN ISSUES1. Anti-collision light switches are located on both the M/P and on the O/H panel (among other lighting switches) on all DC9 panels.
When selected "ON" .... using the O/H panel located switch (only) .... it will not then be posible to set this particular switch to its "OFF" position. We have not, yet, been able to resolve this "very minor" discrepency. The anti-collision light switch located on the M/P can, however, be set to both "ON" and "OFF" positions .... with the corresponding lighting animation on the all DC9 models then responsding accordingly .... without any issues whatsoever.
2. The NG tires on some DC9-30 through -50 series models (only) may, in FS external viewing mode, be observed to "sink/settle slightly" into ground surfaces. This "EXTREMLY MINOR" issue is mostly evident in either default overwight (without the recommended payload or fuel adjustments), or, other high weight/loading situations. This particular issue is caused by a very minor model related COG error affecting DC9-30, -40, and -50 aircraft versions only. PLEASE NOTE .... we are not, at this time, able to resolve this minor detail without redesigning and then reisuing each of the implicated 3D models. PLEASE NOTE ALSO .... this particular issue "DOES NOT", otherwise, affect the manner in which any of these fine DC9 simulations fly in any way shape or form.
3. A red flag remains visible at the bottom center of the ADI guage (the vicinity oif the Localizer Index) used in all of theseDC9 panel versions. The cause of this particular issue has not yet been verified and a resolution/fix is still pending. PLEASE NOTE .... this very minor issue "DOES NOT" affect either the integrety or functionality of the ADI instrument or dtract from ones pleasure/enjoyment in using any of these DC9 simulations.
10.0: A FEW FINAL WORDS These DC9 panels represent complex works of FS engineering.
We appreciate the provided level of complexity/fidelity may not be to everyones taste, but, we do urge folk to try to enjoy these panels .... aided by the information presented above .... which is precisely why these "HANDLING NOTES" have been written.
Each panel has been individually checked/tested prior to uploading.
Each panel was noted to perform "FINE" during testing .... or it simply would not ever have been be uploaded here.
Despite this and our endeavors to deliver the best classic/historic jetliner "FREEWARE", it is not inconceivable that difficulties might be encountered. HJG will endeavor to assist troubleshooting reported issues, but, it must also be understood that a particular problem occurring on one PC system may not be universally experienced. In such cases there may be very little that HJG can do to assist.
Mark C
Auckland, New Zealand
&
Bogota DC, Republica de Colombia

